To control spider mites on herbs, first confirm that active mites are present, then reduce their numbers, correct growing stress and keep checking the plant. Inspect leaf undersides with a hand lens, separate affected pots from healthy herbs where practical, and start with a suitable water rinse. If a spray is needed, use it only where the current Australian label permits the herb, pest and growing situation, and follow its harvest directions.
Pale speckles, yellowing leaves or fine silk can alert you to a problem, but none should automatically trigger treatment. This guide helps you connect the damage with the pest, choose a proportionate response and judge whether your herb is improving.
🌿 In this guide
- Recognise spider mites and distinguish lookalikes
- Work through the beginner checklist
- Understand the causes and seasonal risk
- Choose a response with the Grow Herb Lab framework
- Manage affected herbs and check spray precautions
- Prevent recurrence and avoid common mistakes
- Review frequently asked questions and signs of progress
- Continue learning
🌿 Grow Herb Lab quick facts
| Check | Practical guidance |
|---|---|
| What they are | Tiny plant-feeding arachnids; spider mites are not insects. |
| Typical damage | Fine pale speckles, sometimes progressing to bronzing, drying or leaf loss. |
| Where to inspect | Mainly leaf undersides; inspect affected foliage and nearby leaves. |
| Helpful equipment | A 10× hand lens and a sheet of white paper. |
| Webbing | Fine silk can support identification; heavy webbing is not required for an early infestation. |
| Risk context | Warm, dry conditions and growing stress deserve closer monitoring. |
| First response | Confirm activity, assess the extent, then choose the least disruptive suitable action. |
| Edible-herb caution | Product permission and harvest withholding directions are specific to the label. |
Recognise spider mites on herbs
Spider mites feed on leaf cells. Early damage often resembles many tiny pale pinpricks, called stippling. With heavier feeding, leaves may appear dull, yellow or bronzed, then dry or fall. These changes can develop alongside other growing problems, so inspect the plant rather than diagnosing from colour alone.
Turn over several affected leaves. Under magnification, look for small moving mites, eggs and fine silk associated with the damaged foliage. Adult two-spotted mites are roughly half a millimetre long, so a hand lens is more useful than a quick glance.
Two-spotted spider mite, Tetranychus urticae, occurs throughout Australia. It is one example within the spider-mite group. Despite names such as red spider mite, individuals are not always red, and their colour can change. Do not rely on a red dot or two dark markings to establish the species.
Use the white-paper check carefully
Hold white paper under a suspect leaf and tap the leaf gently. Examine any moving dots with magnification. This makes small creatures easier to see; movement alone does not identify them as spider mites.
Compare what you find with the leaf damage, underside inspection and any webbing. A negative check on one leaf is not proof that the whole plant is clear. If identification remains uncertain, take close photographs and seek help before spraying.
🛠 Spider mites or a lookalike?
| What you notice | Possible explanation | Useful next check |
|---|---|---|
| Fine pale stippling with tiny mites underneath; sometimes fine silk | Spider mites | Inspect several leaves with a hand lens and assess whether damage is spreading. |
| Silvery patches or streaks, often with dark droppings | Thrips | Look for slender insects; a moving speck needs identification. |
| Clusters of larger soft-bodied insects, curled growth or sticky honeydew | Aphids | Compare with the Aphids on Herbs guide. |
| Silk without matching mites and stippled leaf damage | Ordinary spider silk or another explanation | Examine the silk-bearing leaves before choosing a pest treatment. |
| Yellowing or wilting without confirmed mite activity | Another pest, a growing problem or earlier damage | Use the Yellow Leaves on Herbs guide to widen the investigation. |
Several problems can occur together. Finding aphids, for example, does not mean the rest of the plant needs no further inspection.
🌱 Beginner checklist
Before treating an affected herb:
- Inspect several damaged leaves and nearby foliage, including their undersides.
- Use a hand lens; try the white-paper check where helpful.
- Look for a consistent combination of pest activity and damage.
- Check neighbouring plants rather than assuming the problem is confined to one pot.
- Note whether the herb has usable healthy growth or widespread decline.
- Check root-zone moisture, drainage, heat exposure and recent spray history.
- Record what you found so the next inspection can show a trend.
Keep observation separate from interpretation. “Pale dots on three leaves” is an observation. “Spider mites are causing them” needs supporting evidence.
Why spider mites become a problem
Warm, dry weather can favour rapid increases in two-spotted mite populations. Sheltered growing areas can also support activity when outdoor conditions are cooler. An infestation that looks limited now can therefore need another check soon.
Dust and water stress can worsen the situation. However, an affected plant is not evidence that you caused the infestation through poor care. Mites can arrive on plants or be carried between growing areas, including by wind and movement of people or tools.
Natural predators help limit mite numbers. Broad-spectrum insecticides can disrupt those predators and contribute to outbreaks. Reaching for a general insect spray without confirming the pest may therefore create another problem.
Your aim is to manage the pest and the herb’s conditions together. Water stress matters, but keeping every herb constantly wet is not a solution.
📅 Seasonal growing calendar
For Australian growers, use local conditions rather than a fixed national spray calendar.
| Growing situation | What to watch | Practical action |
|---|---|---|
| Warm, dry spells outdoors | Emerging stippling and activity beneath leaves | Inspect more closely and check the herb’s moisture needs. |
| Hot, dusty or exposed positions | Mite activity alongside plant stress | Reduce avoidable dust and stress; assess whether the position suits the herb. |
| Cooler outdoor periods | Persistent damage or activity on sheltered plants | Inspect before deciding that weather alone has resolved the problem. |
| Indoor or protected growing | Suitable conditions can persist beyond the outdoor season | Continue checks where damage or mites have been found. |
Northern Hemisphere adaptation
Apply the same condition-based approach during your local warm, dry season. Do not copy Australian months into a Northern Hemisphere schedule. Heated or sheltered growing spaces may need monitoring outside the normal outdoor risk period.
This panel guides inspection. It does not set pesticide application dates.
🌿 Grow Herb Lab framework: Are mites active, and what response is needed?
Use observe → confirm → respond → recheck:
- Evidence unclear: inspect more leaves or obtain identification help. Investigate alternative causes before treating.
- Mites confirmed, damage limited: separate affected pots where practical, physically reduce mites and monitor the remaining foliage.
- Mites confirmed, damage spreading: review coverage of your removal efforts, neighbouring plants and growing stress. Consider a label-permitted treatment or local advice.
- Severe decline or repeated failure: assess whether enough healthy growth remains for worthwhile recovery. Replacing a small, badly affected herb can be more practical than repeated treatment.
- Damage remains but active mites are not found: continue observation rather than repeatedly spraying old marks.
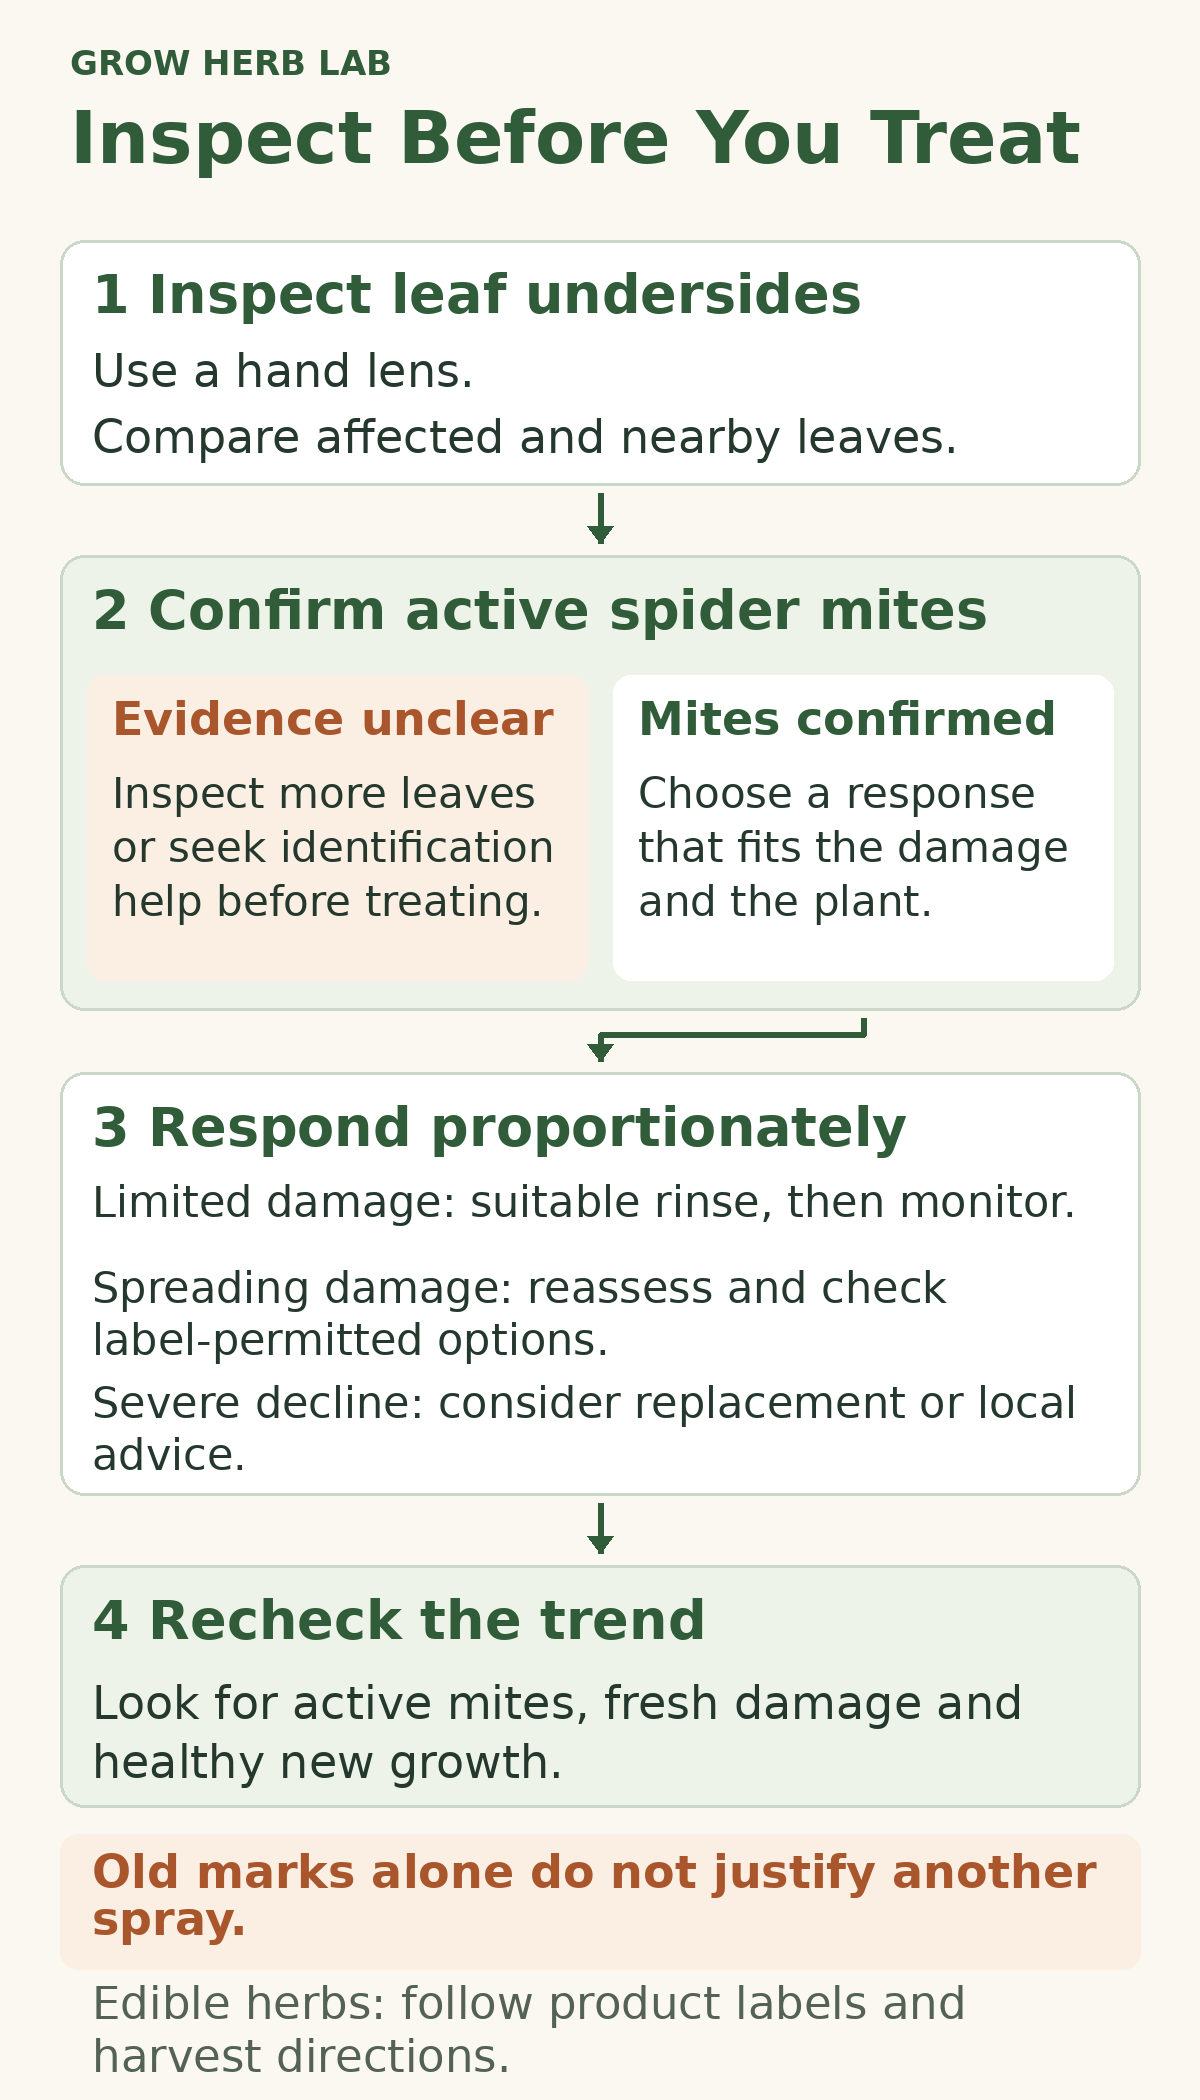
The relevant question is whether pest activity and damage are changing, not whether every leaf looks perfect immediately.
What to do about spider mites on herbs
Separate affected pots and inspect neighbours
Move an affected pot away from healthy herbs if you can provide a suitable growing position. Avoid brushing its foliage through other plants. Isolation reduces opportunities for contact; it does not prove that neighbouring herbs are clear.
For herbs in beds, inspect adjacent plants and work carefully around affected foliage. Wash hands and clean tools after handling an infested plant.
Dislodge mites with a suitable water rinse
A directed water spray can remove many mites and some webbing. Reach leaf undersides rather than simply wetting the top of the plant. A small potted herb may be easier to handle at a sink or an outdoor washing area.
Adjust the force to the foliage: enough to dislodge pests, without tearing tender leaves or snapping stems. Support delicate growth. Keep the pot draining freely and avoid turning repeated leaf washing into repeated saturation of the root zone.
Inspect again afterwards. Physical removal can help considerably, but one rinse should not be treated as proof of complete control.
Remove selected badly affected growth
If a few leaves or shoots are heavily infested, careful removal can reduce the amount of affected foliage you need to manage. Bag removed material as you work so it does not brush against healthy plants.
Retain enough healthy growth for the herb to continue growing. Do not strip the entire canopy or assume that a hard cut into bare woody stems is suitable for every herb. Where nearly all foliage is affected, consider the replacement decision rather than making progressively harsher cuts.
Correct growing stress
Check moisture within the root zone and confirm that water can leave the pot. Meet the herb’s needs without keeping its roots constantly saturated. The Herb Watering Reference Guide explains how to assess watering conditions.
If a pot’s location exposes it to excessive heat or unsuitable growing conditions, reassess the position. Avoid making several unexplained changes at once: record what you alter so you can judge the response.
Recheck and compare
During warm, dry conditions, a check every few days is a useful starting point. Inspect sooner if damage is developing rapidly. Compare similar leaves and nearby growth each time.
Record three things: active mites found, fresh damage appearing and the condition of new growth. An old damaged leaf may stay marked even after control improves; use the whole trend rather than one leaf’s appearance.
Rechecking is an observation schedule. Repeat any pesticide application only as its label directs.
Know when replacement or advice is more practical
A small herb with extensive decline, little healthy foliage and persistent mite activity may not justify repeated treatment. Remove it from the healthy collection and contain infested material during disposal.
For a valued perennial, uncertain identification or continuing failure, seek local horticultural or pest-management advice. Describe what you observed and what you have already tried, including any product used.
⚠️ Before using a spray on edible herbs
Check permission before application
Insecticidal soaps and horticultural oils can be options for mite management, but that does not make every formulation suitable for your edible herb. Read the current Australian label for the specific product.
Check that its directions cover the crop or herb group, spider mites and the growing situation. An ornamental-plant direction is not permission to spray a culinary herb. If the permitted use is unclear, obtain advice rather than guessing a rate or extending the claim yourself.
Follow coverage and repeat-use directions
Contact products depend on reaching the mites, particularly beneath leaves. Follow the label’s mixing rate, coverage, application interval, maximum-use limits and protective instructions.
Do not combine products, increase concentration or shorten intervals because the first application appears disappointing. Reassess the pest and your technique.
Protect the plant and natural enemies
Some sprays can injure foliage, especially under unsuitable temperatures or plant stress. Follow label precautions and any directions for a small-area test. Do not copy a temperature limit from a different product or treat every herb as equally tolerant.
If you use predatory mites, check pesticide compatibility with the biological-control supplier before spraying. A treatment that damages the predators can undermine that approach.
Check harvest directions
The label may specify a withholding period between application and picking edible material. Follow that period and any other harvest restrictions exactly. Do not invent a standard waiting time for all oils, soaps or herbs.
Check the APVMA guidance on home-garden product labels for the role of use directions and withholding statements. The directions on your actual product remain essential.
Avoid homemade washing-up-liquid mixtures. Household detergent is not a substitute for a labelled horticultural product and can damage leaves.
Prevent another infestation
Inspect new herbs before placing them amongst established plants. Look underneath leaves as well as at the attractive new growth on top. Continue checking after arrival; a single inspection can miss a developing problem.
Maintain a position, watering approach and drainage suited to each herb. Reduce avoidable dust around the growing area and monitor affected neighbours while the original plant is recovering.
Preserve beneficial predators
Predatory mites and other natural enemies can contribute to control. Do not assume every small mite on a leaf is harmful, or use an indiscriminate spray simply because insects are present.
Purchased biological controls can be useful in suitable systems, but they are not a guaranteed cure for every balcony pot. Ask an Australian supplier about the pest, growing environment, release conditions and compatibility with previous sprays. Choose a plan suited to your plants rather than borrowing commercial crop thresholds.
Do not rely on misting alone
Humidity can influence spider-mite activity, but briefly misting leaves is not equivalent to physically removing mites or establishing effective control. Do not keep a herb wet or enclosed merely to increase humidity. Continue inspecting and responding to confirmed activity.
⚠️ Common mistakes
| Mistake | Better approach |
|---|---|
| Treating yellow leaves without confirming a pest | Inspect leaf undersides and investigate other causes. |
| Waiting for heavy webbing | Check early damage before the infestation becomes obvious. |
| Assuming every mite is red or harmful | Use magnification and identification evidence. |
| Soaking the pot whenever leaves are rinsed | Separate foliage cleaning from root-zone watering needs. |
| Using a broad-spectrum spray automatically | Protect predators and choose an appropriate response. |
| Making a stronger homemade soap mixture | Avoid detergent recipes; follow a permitted product’s label. |
| Harvesting without checking treatment directions | Read withholding and harvest instructions before picking. |
| Stopping checks after one improvement | Continue monitoring active mites and fresh damage. |
🌿 Frequently asked questions
Can spider mites be present without webbing?
Yes. Webbing is often easier to notice as numbers rise. Early stippling should prompt a closer underside inspection rather than a wait for visible silk.
Are red dots always spider mites?
No. Spider-mite colour varies, and other small creatures can occur on plants. Colour alone is not a diagnosis.
Does misting get rid of them?
Do not rely on it. A directed rinse can physically dislodge mites; light misting should not replace inspection and a management plan.
How often should I recheck?
Check every few days during favourable conditions or an active problem, adjusting to the rate of change. This does not authorise pesticide applications at the same interval.
Can I harvest a treated herb?
Follow the actual product’s permitted-use and harvest directions, including any withholding period. If you cannot establish what was applied or whether the crop use was permitted, seek advice before harvesting.
When should I replace the plant?
Consider replacement when a small herb is badly damaged, has little useful healthy growth and remains difficult to manage. A valued perennial may warrant identification or specialist advice first.
🌿 Key takeaways
- Connect the leaf damage with active pest evidence before treatment.
- Begin with suitable physical removal and care adjustments.
- Use pesticide directions specific to the product, herb and growing situation.
- Monitor remaining mites, fresh damage and new growth rather than expecting old marks to disappear.
🌿 What success looks like
Across repeated checks, you find fewer active mites, damage stops spreading and new growth develops without the same pattern of injury. Existing marks can remain. Progress also means nearby herbs are being checked and the treated plant has suitable growing conditions.
Recovery depends on the herb and the extent of damage. There is no fixed number of days after which every plant is clear or ready to return to its neighbours.
🌿 Continue learning
🌿 Related growing guides
- How to Grow Basil — review the growing conditions of a kitchen herb alongside pest management.
📚 Reference guidance
- Herb Watering Reference Guide — assess moisture needs without keeping every herb constantly wet.
🛠 Problem solving
- Aphids on Herbs — compare another common pest and its signs.
- Yellow Leaves on Herbs — widen the diagnosis where mite evidence does not explain the symptoms.
📥 Free resources
- Beginner Herb Growing Kit — practical checklists and reference sheets for everyday herb care.
🌿 Final thoughts
The most useful first step is a close inspection. Once you know what is active, choose an appropriate response and judge it through repeat observations. That gives you a clearer basis for the next decision than repeatedly treating a damaged leaf without checking its cause.